Changing Fuel Types on Alfa Forni™ Pizza Ovens
Alfa Forni™ Gas / Propane pizza ovens ship preconfigured to cook with either propane or natural gas, and include the components needed to switch to the other fuel type.
These models are shipped ready to use propane: Moderno Portable*, Nano, Brio, Moderno 2 Pizze, and Classico 2 Pizze.
These models are shipped ready to use natural gas: Moderno 3 Pizze, Moderno 5 Pizze, Classico 4 Pizze, Futuro 2 Pizze, and Futuro 4 Pizze.
*The Moderno Portable can only cook with liquid propane
By following these steps you can switch from propane to gas, or from gas to propane:

Step 1: Turn off the gas supplyBefore you begin, make sure to fully close off the gas flow. Then, shut down either the main gas valve or the LPG cylinder. |

Step 2: Remove the gas knobTo remove the gas knob (A), simply give it a gentle pull in the direction indicated by the arrow. |

Step 3: Disconnect the hoseTo detach the gas tube (B), use a 24 wrench or suitable pliers. |

Step 4: Remove the casingTo remove the protective casing (C), unscrew the designated screws shown in the photo that secure it to the oven. |

Step 5: Release the burnerTo unlock the burner (D), remove the screw highlighted in the red circle using a 4mm hex wrench. |

Step 6: Remove the burnerCarefully pull out the burner halfway, being mindful not to damage the ignition cable (E). |

Step 7: Disconnect the ignition cableTurn to the side to access the assembly unit and disconnect the white ignition cable. Use tweezers if necessary, gripping the black sheath for assistance. |

Step 8: Identify the nozzle for replacementOnce the burner is removed, you'll see the golden nozzle (F) that needs to be replaced. |

Step 9: Remove the nozzleTo detach the nozzle, use an 11 wrench, unscrewing it similar to a standard nut. Rotate the wrench from top to bottom. |

Step 10: Release the pilot groupTo adjust the pilot flame, remove the pilot group block (G) by unscrewing the two screws circled in red. |
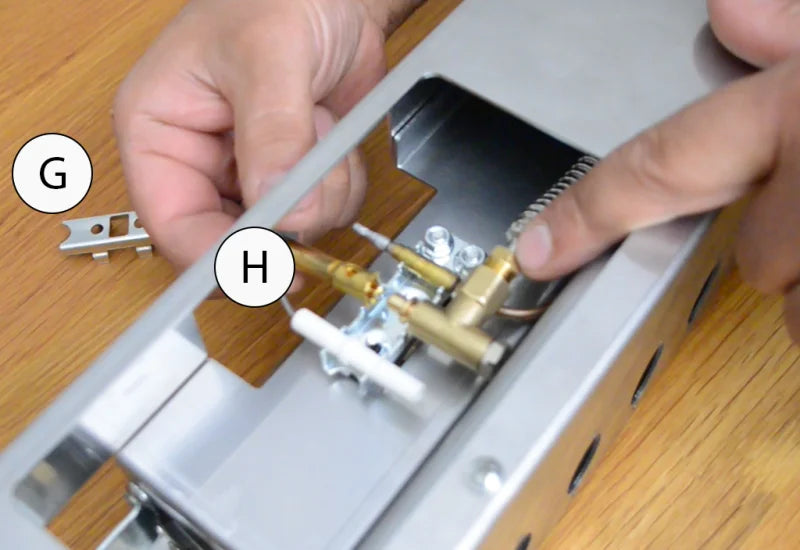
Step 11: Remove the pilot flameOnce the pilot group block (G) is removed, proceed to take out the pilot flame head (H). |

Step 12: Access the nozzleRaise the pilot flame and then unscrew the cap to access the pilot flame nozzle (L). |

Step 13: Install the new pilot flame nozzleUsing an appropriate screwdriver, unscrew the existing nozzle (L) and replace it with the new one. |

Step 14: Restoring the pilot flameReposition the pilot flame head as shown in the enlarged photo. Make sure the "T" formation created by the openings aligns with the indicated position. |

Step 15: Reinstall the pilot groupNow, reintegrate the pilot assembly by placing back the block (G) that was previously removed. Then, follow the steps in reverse from step 7 to step 2 above to reassemble. |
Step 16: Light up your ovenWhen you ignite your oven again, make sure the flame is strong and that no leaks are detected. |
Note: These steps should be completed by a qualified professional.